Sunday, March 30, 2008

Treehouse ~ Or is it tree house?


Ok, so we have this treehouse that we have been working on for a while now. Wood Genius has recently been re-invigorated into finishing this project ~ possibly because all of us have made a pact to finish it this spring, AND we are actually doing it. Naturally, whenever I work on a project, he feels a massive desire to get involved as well. This is actually part of my master planning. You see, the truth is, I am not all that hot or technical with wood, mathematics, and dangerous wood-cutting tools. However.... hehehe ... BWAAAAhahahahahah.... I DO possess enough sense ~ CUNNING sense ~ to realize that Wood Genius IS. AND, I also know this secret ~ it drives him INSANE to see me royally screwing up a project. ..... :-D.... And hence we obtain take-off.

Yes, I know, it's all so Huck Finn of me, but you know, there is a great deal of pleasure in the machinations.


Well, I could go on, but why? You get the idea. Like she said in "My Big Fat Greek Wedding", "Yes, the man is the head of the house, but the woman, she is the neck, and the neck, it turns the head, aaannnyyy way she want to."

That's the idea, anyway. It also helps a LOT that this particular project is one that Wood Genius is IMMENSELY interested in. He has had SOOO much fun doing it. So, without further ado, I will show some pics of our as-yet-unfinished treehouse.

Ughh ~ the yard looks awful ~ it's that gushy 10-tons-of-snow-just-melted-into-your-yard plus all-the-crap-you-didn't-clean-up-last-fall look.

There is even some snow still left ~ however, we are trying hard not to focus on that, and we hope you will too. :-D Perhaps if we all concentrate on no more snow together, it will really come true, and spring can once again come to Narnia.


This is Wood Genius with the entire neighborhood up in the treehouse, scheming on the final touches. The table & benches that turn into a huge sleeping area, the little kitchenette, complete with a pump & thus ~running water~, book shelves, hooks for flashlights, windows that open, battlements ( or flowerboxes, depending on the gender) to be used in rubberband-gun wars, pulley's for the baskets, & about a hundred other fun ideas. One little gal came up with a grand idea of making a split front door, with a peephole on the bottom half.


Another child decided that French doors leading out to the miniscule deck would be enchanting.

And Wood Genius came up with this great handle to make sure that no-one could ever get locked out there.


And here are the windows & screens that just need plexi-glass & hinges added.


See? Not even a layer of dust! We are actually going to install these tomorrow, & paint & install the doors after that. I have been swaying back & forth between painting the outside of the treehouse in a barn red, with white accents, ( it would match the shed) or staining it with a natural cedar ( sort of an orange-ish tint). The cedar color would probably blend into the tree & yard better, but I think the red would be far cuter. Naturally, Wood Genius & young son are not for the *cute* version. They would rather have the *spy-guy hiding in the woods secretively* version.
So, I am taking a poll: Which is better? Barn red (very dark, with white accents)
or Natural orangey-ish cedar stain

Friday, March 28, 2008

Comedy & Tragedy

Et tu, Brute? ( yah, yah, yah, but it fits the picture)


I find this little lesson on Ancient Greek history rather amusing ~ a tragic comedy indeed!


Ένας αρουραίος στο σπίτι μυρίζει ~ αλλά μια μυρωδιά στοσπίτι μπορεί να είναι δύσκολη στον αρουραίο έξω.


nos venit , nos video , nos victum ~
~yes, it's a moldy oldy, but a goodie woodie ~
The kids are learning Latin from the Rosetta Stone homeschool series ~ excellent, & I HIGHLY reccomend it! They speak better Latin than I do at the moment.

Among other things, we also had great fun sculpting & labeling the heart

and the digestive system.


I would show you Izzy's version of this, however, it was a little too crude. Yes, he included the stinky, lumpy brown end results. All I can do is point to Wood Genius & say, "That must be Your son!" (to which Mr. Wood Genius simply smiles, flicks a conspiratorial smirk in Izzy's general direction and proudly acknowledges all stink relations.....)

We did weavings, ( part of our trip through Europe & Asia with Marco Polo)


as well as model ships.


This candy lab had to be one of the most disgusting labs ever ~ in part because we actually tasted the results of our lab-work. ( It was dealing with the different chemical reactions of sugar heated to various temps, & the like.) Included were rootbeer, gummi candies, marshmallows, & bubblegum. BLeaahhgg!


Here we have Valentine's Day woven heart baskets. They were quite fun & a little challenging. I am thinking some origami would be great as well. Definitely going to be included when we cover Japan.


And of course, the dead, drowned fly experiment. We swatted this fly without squishing him, ( a stunning blow :-0 ) drowned him ( held him under water till he quit struggling... ooohhh .. how sadistic!..), let him sit there drowned for a few hours, and then put him on a bed of salt, and covered him with salt ~ & Voila!~ within moments ~ re-incarnated to fresh NEW FLY status! It was beautiful. We all wept. And then smashed him for good. Gotta love homeschool ~ smashing him for good afterward wouldn't have been very politically correct in Public school. Yep, that's why WE homeschool... so we can still smash the flies and be gleeful in our doing so. (:7-- <<<---
That's a chicken face ~ pre-cursor to the next blog entry, & our latest homeschool adventure.

Wednesday, March 12, 2008

Spring has Sprung! ~ Sorta

Well, I have to admit it ~ the springy new-seeds-&-planting-devices-so-you-can-feel-less-hemmed-in-by-the-seemingly-ever-present-visage-of-a-snowbound-yard-stuff bug has bitten us all HARD this year! Those demographically correct advertising consultants certainly do know their stuff ~

A quick stroll through Wally-world, Home Repo, & Slowes will truly get the green blood pumping ~ straight into that thumb! And if you have an especially robust case of it, the green stuff well may spread straight up your wrist and into your wallet as well. I know I was affected.

How badly? Wweeeeeeeellllllll...........

Pretty badly.


Actually.

So badly that I had to gear an entire week around garden plotting, graphing, layout, seed purchasing ( did you know that our $1 store had seeds at 8/$1? WAHHOOO! *YES* I succumbed...) , and other sundry starting cells, & cold-framing accoutrements. Heck, I even included a ~science experiment~ in the lot, making it count for that as well.


This is a bean that we soaked for a few days so that it would easily split in two. Thus the tiny baby plant inside can be seen, even with the naked eye.


And of course, it can be seen even better with a little magnification.


After we learned about the parts of a plant, and their specific duties, we delved into garden plotting, planting zones, soil requirements, lighting requirements, fertilization & insect control, and of course, the big *What do we want to plant ..... that is reasonable... in our zone 4.7 area* question. ( waaahhaaa, I wish we were zone 5.5 at least....so many lovely plants cut off....)


First we planted the herb pots. (Rosemary, Sage, Thyme, chives, lavender, & basil.)


And labeled everything.


Then we got down to REAL business, with all of the vegetables & flowers.


Here are some of our finished rooting cells. (That plethora of chafing pans surely did come in handy!! Five jiffy pack peat cells fit perfectly there-in.)

Update: The next morning we woke up and ALREADY some of the lettuce, spinach, peas, and tomatoes were sprouting out!! YEAH!


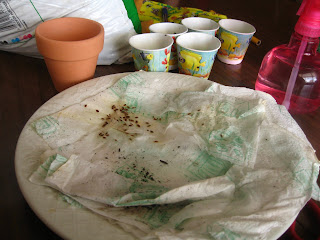
One of the tricks?


A plate, some napkins, and a spritzer filled with very warm water. We also watered down the rooting cells with the warm water after filling them with soil. Once the seeds sat on the wet paper towels for a few minutes, we just sprinkled them onto the top of the cells. Then we plastic-wrapped the whole affair & let them sit overnight. Next morning, we spritzed them with warm water again, sprinkled a light layer of soil over the top, and spritzed again. And what do you know, those little seeds have already started sprouting! The kids are thrilled, as we didn't think we would get such immediate results ~ in fact, I was going off of the pkg info, which said germination in 5-10 days. so... WOO ~hoo!!
Shout out to my sister ~ Hester, you would SOO love homeschooling ~ in fact, I think my other sistah's would too, it's so much more fun than public, AND you can do SO much more! I can't wait till the sidewalks are free of ice & snow, as we are going to hold school at the parks, & etc. We can ride our bikes over to the greenbelt, the museum, and several other parks ~ it is just SOO much cooler than public! :-D

Friday, February 08, 2008

P.E. ~ Homeschool style

(Buried by the bloggernots)

Ahhhh ~ time to blog again, I see. Once again I have managed to neglect my blogger-duties for a month and a half run ~

The truth is, homeschooling takes a heck of a lot of time!

Yup, that's my excuse this time ~ That's my ssstory & Aaahhhhh'm sssstickin' to it!

(Can't get that song out of your head, now, can yah? heheh, you see how I have effectively diverted all derogatory, impure thoughts of a slacking blogger to a catchy little tune that deflects naughtiness & slyly imposes cathartic rationalization :-D... ain't I clever?)


(digging oneself out of the pit)

So we've had a lot of snow lately...... and my kids were complaining that it just plain wasn't fair that all the other PUBLIC SCHOOL kids were getting snow days, and O~Woe is them~ homeschool kids just don't seem to NEED snow days.......


In my infinite mother-wisdom, I thought up a brilliant plan ~ pretend you're at Valley Forge,
& you have to make up embankments, forts, and other hasty, snowy living quarters ~ & thus,


the grandDaddy of all Snow Forts was born.


See the cars in the background? This is some SERIOUS snow. Well, for US, anyway. Now, I know the Canadians & Alaskans have us licked, but for Idaho, we're doin' perty dern gewd.
:-D


So this is how my kids spend their recesses & P.E.'s ~ homeschool style. Amazingly enough, not a single child was punished for kicking snow, throwing snowballs, sliding down the snow piles, making a fort, or even picking up ice.
~Behind the scenes story: Last year, when my kids were still in public school, my son was walking along at recess one day, tripped on a bit of ice, and ~get this~ actually got punished for kicking up a bit of snow on his way down. Yes, it's true, they punished him for kicking up snow as he fell on the ice. Playground duty nazi's. To make the punishment all the more *memorable*, those dear lovely people then made my son stand against a shaded cold brick wall and do nothing in 13 degree weather, because he was such a sinner in kicking up that bit of snow as he fell. Couldn't even move to keep his body warm. Came home with a cold. Yes, that was just about the last straw. ~

We have grown to not only love, but truly EMBRACE, homeschooling. The level of agency, joy, freedom, & positive education has risen to such heights! We could never go back, not physically, not mentally.
Yes, it's time-consuming; yes, it's far more intensive; yes, some days it's even a struggle ~ but oh ~ the rewards are so much the greater. One day, I believe I will post the essays my kids wrote about homeschool, but for now, a little ode ( yes, yes, I know, I am waxing ode-ious, tut, tut).
A Little Ode
Who can say the joy, who can say the gain
who can see the difference, in a child's world again?
To be a little one, to live those years once more
to look into the past, and see the future's store.
Ah, the joy of learning, of seeing each new thing,
Ah the simple delight, of a butterfly on the wing.
The wonder in her eyes, as she sees her garden grow,
the awe upon his face, as he gains new things to know.
Did I really *teach* them anything new today?
Or did I simply open a new page along the way~
a path they can trod down, if only they should wish it
a tome of life exploring, such knowledge to transmit!
For in the end I know tis true, I do not educate them,
instead they educate themselves, & cut their own fair gem.
Indeed I often see, in moments dear & merry
each child a bright young jewel, their own self lapidary.
For who can cut upon the face, such brilliant shine & luster
Than the own sweet child himself, as much as he can muster.
Yes, The fire to learn flares deep within,
'tis not a thing I do,
but rather what light I might reflect,
upon the mind therein.
~C. G.
I know it doesn't rhyme so hot, but it's 2:30 in the am,
(That'sssss my sssstory, & Aaahh'mm ssstickin' to it!)
:-D


Thursday, December 20, 2007

The MASSIVE Dollhouse Venture Part 4

Well, I have this little confession to make ~ I have started on the little tiny dollhouse things ~ but I HAVEN'T finished trimming out the exterior of the dollhouse yet ~ I think I may take this opportunity to blame it on Kat.... It's HER dollhouse, right? She REALLY needs to get on it, and trim out that exterior. Sheesh! The lackadaisical attitude some people's kids have developed of late!!
;-D
OK, that over, wanna see some really awesome little tiny things? :-D
Well, Kat & I think they are really awesome, anyway!
If you want to really see them up close, click on them, and you can get a MUCH bigger pic.


This is a little collection of decanters, flasks, perfume bottles, and candle sticks that I made out of different beads I had. I also used some odd shaped nuts, a wall screw thingy, and some buttons for the bases of the chinese jars, and I used porcupine quills for the candles. The natural brown on the ends of the quills were perfect for a burnt wick look, and on the pair that didn't have the brown, I just markered it on. Also, I just used regular dollar store super glue. I recommend the gel kind for the bead work, rather than the thinner liquid kind, as the liquid kind tends to drip, run, and get your fingers stuck to everything!
I put a quarter in some of the pics, so you can sort of gauge the size.


Here are some little boxes and food containers. We were able to get the printies off of http://www.jennifersprintables.com/ . I used plastic from a WalMart bag to make the cereal liner, and wood shavings compliments of Wood Genius for the grape nuts & corn flakes. I also weighted the boxes with either a piece of wood glued to the bottom of the inside of the boxes or put cornstarch into them. For the gelatin & starch boxes, I just glued the printie around a piece of wood cut to fit.


Perhaps you can see the tiny size by noticing the wooden spool of thread or the needle packet in the background.
Here are a collection of miniature dolls I have made for the dollhouse. The largest doll is all porcelain, 6" tall, and she was actually a dollar store find. I just stripped off her cheesy fake Hawaiian outfit & made her some new clothes out of vintage fabrics & laces.

The other three dolls I made are out of porcelain body parts that I got off of eBay, with hand stitched leather bodies. They have wire armatures, and are stuffed with sawdust. Again, thanks to Wood Genius.


This tiny baby doll is so little, she is only 1 1/2" tall. Yes, that's one and a half. :-D


I hand stitched their outfits out of vintage laces & silk ribbons. Perhaps you can see the smocking on the little blue baby dress. I had to use a single strand of sewing thread to make it the right size.


Ahhh... see the little girl? She is holding her baby sister ~ the little girl is only 3" tall.


Here you can see her leather body, and the porcelain parts. You can also see the hand stitching, which looks large in this close-up pic, but is really hardly visible to the naked eye. (well, to MY naked eye, anyway... your naked eye may be better eyesighted than mine....naked eyes, you know...) I was extremely lucky to find these tiny porcelain parts on eBay, I have never seen anything so tiny to make dolls from since. I have seen larger pieces, but nothing scaled to this perfect 1/12 size, unless you go with pre-made pipe-cleaner dolls from China or Germany. None with my leather bodies, however. :-D

Hopefully, they last a good long time, which is why I made them out of leather. Remember, Kat says she is going to hand this down to a granddaughter, so I have to make things that will hold up. :-D ( It's my duty...heheheh) Plus it's fun!

And last, but definitely not least, here is Wood Genius, to whom we must once again, say thanks!! He keeps providing us with lots & lots of fun things from the shop to use, as well as ideas and technical support. (Kat & I are sorta clueless, we admit this freely, and without shame. After all, as I have mentioned before ~ you don't see the words "Wood Genius" tacked on in front of either of OUR names! ;-D)
For Part 5 of this Venture, I will show some of the furniture that Wood Genius has made into kits for us. ( that is a 2-fold reasoning ~ 1) Kat & I feel like we are actually *good* at making cute miniatures, and 2) Wood Genius doesn't spend all his time making miniatures. :-D)
Isn't he beautiful? ( and he would say ~ "Yup, that's what I strive for, beautiful......" ) :-d
PART 5

Sunday, December 02, 2007

The MASSIVE Dollhouse Venture Part 3

PART 3

All right, I'll bet by now you are wondering just what this dollhouse looks like all put together, since up till now I have merely shown bits and pieces of it.


Here we have from the front, with no molding, no window trimming, no nothing on the ouside yet except a bit of trim around the roof line. This is because it's so VERY much funner to do all that itty bitty stuff on the inside. However, I was reading this book on miniatures by a Marion Mave O'Brien (sp?) and she SPECIFICALLY cautioned about getting too caught up in the insides before you finish the outsides. Boy is she right.


This picture shows the full extension drawer guide that Tony the Wood Genius used to support the front half of the dollhouse when opened. This makes it possible to have 2 kids playing and arranging without knocking elbows.


This is my cheesy mitered trim, Wood Genius was annoyed that I did not fit it better, over that brass piano hinge. I carved it to fit, but, of course, you don't see the words "Wood Genius" in front of MY name. ;-P
Trim still needs to be spackled, painted, etc.

This is my free-handed cheesy answer to Wood Genius being too busy to make a chimney box. Some Day I will add a real box on there, even if it only sticks out 1/4", and paint the stones on again. As it is, I mixed fine sand with the paint to make it a ~stone~ texture. It does feel correct, even if th e chimney sorta swaaaayyyys.


And here it is, open. You can see Kat papered the kitchen in contact paper trim. A little large in design, but oh well. Kat did it herself, and she did a darn good job of it. We found some FANTASTIC websites for wallpaper ~ http://www.jennifersprintables.com/ ~
She has tons of other fun miniature printies there as well.
We will show more pics of the dollhouse after we get some of those prints put up. I think that papering does sucha fine job of scaling a room. Just paint really doesn't seem to translate scale very well.
We also don't have any base or ceiling trim moldings up yet, which will help too.


Here is a shot before we hinged the front to the back and finished the flooring ~ you can see how those little miniatures just seem to gravitate towards the house, regardless of progress on the whole.

Here we have 2 different bathroom versions. I kind of think the teeny tiny terracotta room is just right for a bathroom. (All right, all right, I have to admit it, I was the one that set this & the other bathroom pic up ~ they were just so CUTE, it was hard to resist. But I really HAVE to get that outer trim and inside moldings & papering done.....)


This is the Luxurious Large bathroom ~ too much room, I think ~ I might have to talk Kat into putting the laundry room in here, instead. Laundry rooms can have swirly tile, right? ;-D


Uh oh ~ here you can REALLY see that snasty pattern faux pas in the flooring ~ but I DON'T CARE ~ I am so NOT digging that floor up ... it adds character, ..... it adds character... it adds character.....
Next Dollhouse Venture post will show papered walls and (I hope!!) trim moldings.


PART 4