Friday, May 29, 2009

Fairy Tree Stump Dollhouse

Well my friends & fellow bloggers, I have taken quite the blogging sabbatical, it is true. Once again, I have done the no-show. You know, it's funny ~ it's one of those blurt-blog things, I think. Yup, it's all becoming quite evident to me now, I am a *Blurt-Blogger*. I blog in blurty spirts. Hmmmm... I could ode that..... :-D (Hmm again, maybe I will change my blog name to that ~ it DOES fit rather aptly!!)

But instead, I will save you all the pain of yet another blurty-spirty blogging ode, & launch into my latest subject-of-interest.

Ahhhh yes, the Fairy Tree Stump Dollhouse!!!!
Here we have the delighted young dollhouse owner, trying on her new dollhouse, before any floors or interior walls were added.

Why, it FITS!!

She's very proud of Wood Genius' (aka Daddy) creation.


Wood Genius is adding some detail, taking off here & there to provvide a realistic ~log stump~ effect.


And now he has the interior fitted, and has begun to add more windows & doors.


Some of the detail on the main floor, tree growth rings & stone steps, all carved to make the piece look as much like a real tree stump as possible.


A few of the side windows & doors. Wood Genius used actual door hinges to hinge this, as it is QUITE heavy.

The main front doors ~ with a carved leaf on the front, and locking bars inside ( to keep out any wandering trolls, GI Joes, and miscellaneous Lego Pirate types..... younger brother does seem to have a rather impressive army of them.)


Here is the view walking into through the front doors. Just outside the window is a swing, hooked onto the large branch stump, of course. ;-D Oh, and it should be noted that that branch stump is actually an opening, for the fairies to take off & return from. They can fly straight out & come back through it.... apparently the front door is just for their little non-flying friends. :-D


This is the view from the side door, with the stump


Here we have another view from one of the windows.


And one more view.


This is the secret lock & key, so that no other humans except the owner can open the stump. Only fairies can have continual access through the fly-in's.


And here is the secret door for the key. (To which Wood Genius later added a carved leaf attached to a leather thong, so that it would be a lot harder to lose. Because even mature little Fairy Stump Owners sometimes have a hard time keeping track of special keys for special doors.)

Ahh, The fairies are especially active at night, & love to light up the stump with parties & fun!


Sometimes they even leave the doors open......I guess these are Idaho Fairies, not New York Fairies. ;-D


And now I have added a little color to the piece. Yes, it is still a little loud, because I haven't brushed it down with a dark wash.... all in time, my little ones, all in time.....


Once I get the wash added, I will accent a few of the rooms, and finish coat everything in a matte top coat, so that the wood doesn't stray from expansion or contraction.


Ahh, here is a better view of that Fly-In branch stump. The fairies really dig that, you know. It makes it so that they can be in (& out of) their abode without human interventions. Quite handy if you are a Little People. Unfortunately, the swing had to be removed because of painting, but the pesky humans will soon be finished with their ministrations, and the fairies can get back to partying like they prefer.
~Red

Tuesday, December 30, 2008

The Dollhouse Venture Part V

Well, it's been quite a while since I have updated on the Dollhouse Venture. Since we have been doing quite a bit to it in the last little while, I figured there was enough of an improvement to show another installment.

Here is a bed that Wood Genius designed, & I strung together. It's 1:12 scale & would be a queen-sized bed. See the little cedar chest in the background? Yup, he made that too.


And of course you can't have a new bed without some new bedding, sooo... I had to make a mattress & pillow, plus a sheet set to fit.


And then of course, what is a new bed & everything without a quilt & bed pillows? And yes, of course I even hand-tied it ~ ;-D ~ I used quilting thread as the string, and actually, although this may look like bitty pieces of fabrics, heheh... even I am not THAT dedicated ~ that pattern & a few other may be downloaded at Dollhouse Miniature Printables . I just starched a thin piece of muslin, & put it through my printer with a pc of paper, set on high quality print, and VOILA! ~instant dolly quilt. Also, you can play with the sizes, by stretching your printer settings or saving the printie to my docs, then running it through a photo-shop program.


Wood Genius & I have also been hard at work on the exterior of the dollhouse. I added most of the window fittings ( all right, just easy ones, it's true, in fact, if you click on the pick, you can see that I have still left the difficult fitting to him to cut ~ it's just better that way.) ;-D I might draw some attention to the NEW doorway & walnut front entrance door. We are painting the fireplace, entrance pillars & some floor trim as I write this, but the walnut door is getting stained. Plus I still have to add hardware to it ( handle, name-plate, doorbell, etc).


Here you can see that while there have been quite a few improvements, I am still definitely ~in process~. I am in the middle of adding ceiling mouldings, wallpapers, chair-rails, and in some cases, even partitions & closets, & such. While most of the wallpapers came from Jennifer's Free Dollhouse Printables, ( which, by the way, is a MOST FANTASTIC site!!), a few came from those old-fashioned dollhouse papers books, and ~ believe it or not ~ some of those chair rail papers & such came from a Martha Stewart line of scrap-booking stuff. Man, if I had the fundage, I would have used SO MANY of the ADORABLE scrapbooking goodies from Martha Stewart. I don't care if she DID go to jail, that lady is CREATIVE!


Another thing I have been working on is the interior window & door trims. What door trims?, you might ask ~ I don't see any door trims! Well, ok, so that's true, I HAVEN'T done any door trims... hence the "working on it" qualifier. ;-D

At any rate, this little room doesn't NEED any door trims, so HAH! What house can be complete without a sun-shiney sewing room? Now if only MY sewing room were this ...ahem.. ORganized... ;-D


Here you can see the important work getting done ~ the little girl is getting measured for her new dress! And that lovely old doll doing the measuring? She is something I picked up off of eBay, an interesting china head with only her head left as original, everything else seems to be either pasted back together or even whole new parts made ~ entirely out of paste. As a result, once the other dollhouse dolls are done, I'm afraid she is going to be relegated to maid status. tsk tsk tsk... such biases! ;-D


Here we have the little baby girl's nursery room, complete with a pretty china doll that seemed to want to be in the room, & therefore the picture as well. Note the basket of flowers ~ they are real dried Hidcote lavender, from my Mum's garden. Obviously a necessity next to a changing table, as they don't have disposables in this house.


Here is the formal dining room, complete with baby chair. I suppose in all reality, the baby chair should really go in the kitchen, & the table should be larger, however, the kitchen isn't quite done, and neither is the table, so... these old, not-quite-to-scale pieces will simply have to suffice.

I might point out, however, that Wood Genius was genuinely annoyed that I might mix both scale & non-scale pieces... and therefore has been talking about designing some more scale furniture.

hehehehehe

Do you see my clever plan? Naturally, once sufficiently bothered, he will have no choice but to make a few more scale pieces.

heheheheh ~ MWAahahahahahahaaaaaa....


Here is the parent's room, with that bed & cedar chest that Wood Genius made, as well as the dresser from Grandma G, & the bedding & perfume bottles that I made. The pictures are made from scrapbooking plates, and old stamps as the artwork. The yarn balls are from some dollar store decoration.


Here you can see that I did get some of the ceiling moulding in ~ the bathroom & a few other rooms. The moulding is trim picked up from Micheal's, very cheaply, I might add ~ about $1.95 for 3 ft. lengths. Also, if you click on the pic to enlarge it, please o please o please ~ DO notice the little tiny handmade soaps! It can't be a 1900's house without handmade soaps, you know. ;-D And the bathing beauty there in the tub isn't to perfect scale, but who cares, she has a funky blue bathing cap, and that's what matters! ;-D


Now in this pic, we have the largely unfinished playroom. It still needs mouldings & door trims ~ true ~ but more importantly, I still haven't finished a wall in the background ( as represented by the stripey wallpapers) which I will be putting in to add interest & depth to the room.


There is still much to do in the dollhouse, but at least it is starting to look inhabitable, if only by dustbunnies & non-eating or nanny-needing dolls. Yup, you guessed it, still have the kitchen & the nanny room to go, plus the parlor, the entrance, both floors of the library, the music room, the schoolroom, & the attic. Oh, and did I mention the hallway? And I thought it would be so COOL to have so many rooms! HAH! A love-hate relationship if there ever was one. Much like our real house, actually. Nice, large, many rooms... but UGGHH> the cleaning that that much space requires. Still, let me dis not my abode, lest I be found ungrateful. ;-D

And what, you may ask, is THIS pic of? Well, it's a start. Because, you see, this little 6" dolly is a FAIRY. That's right, a fairy... I mean, she obviously doesn't have her wings on yet, and she is naked as the day I stitched her together, HOWEVER, she is a START. You see, the next dollhouse update that I do will include pics of her tree-stump fairy house! That is right, Wood Genius is right now, even as I write, shaping the fairy house. It is 4 stories high, with a slide, and a swing, and once the doors & windows get cut out, it will really start to come to life. I will include a few teaser pics at the bottom of the post, just to get the gears turning.

He truly IS a Wood Genius! This is a totally engineered tree stump, carved to look real. And like I said, this isn't the half of it ~ when it's done, it will be a 1:12 scale fairy tree stump dollhouse.

~Red

Wednesday, December 03, 2008

SOAP UPDATE ~ NEW SCENTS ~ Yup! It's addicting!

Here are the soaps I am offering for sale.
All of these soaps are made with pure spring water & olive oil, except for Hawaiian Rains, which was made with collected rainwater.

Camaflouge
Here is a dual purpose soap for men who like to hunt ~ it smells like DIRT! It's true ~ it smells like dirt, with eucalyptus & citronella as fantastic natural bug repellant as well. It will hide your own scent, AND keep the bugs away. What more could a man ask for? (in a soap! ;-D)


Zesty Twist

A delightful herb citrus hyacinth blend of natural essentials oils, with green tea added as a mild astringent/ deodorizer. Contains olive & coconut oils, for skin nourishing cleansing, & has no colorants other than what the tea gives it.


Soft Flowers

Carnation, tuberose & jasmine topnotes, with baby powder undertones. This soap is colored with pure, unsweetened crabapple juice, & so may be used by those sensitive to dyes. Completely safe for babies. Made with olive & coconut oils.


My Favorite Bookstore

Café latte topnotes, with hazelnut & cinnamon undertones, as well as a hint of peppermint ~ I named this one "My favorite Bookstore", because it reminds me of that heavenly fresh ground coffee blend scent you get when you walk into the Barnes & Noble Bookstore, right after walking past the cinnamon nuts stand. Men & women alike will adore this soap, plus, it may be used as a shaving soap. The cinnamon helps lift the beard for a smooth shave, while olive oil ensures clean, moisturizing softness.


Crabby Apples

A lovely soft hibiscus scent, with crabapple undertones, not strong at all. Dyed with pure, unsweetened crabapple juice, & incorporating olive & coconut oils, this soap is perfect for anyone! It is full of natural glycerin, & will sooth & smooth the skin.


Lavender Essentials

This soap has the rich, heady aroma of fresh Hidcote lavender, & contains lavender essential oils as well. The slight color comes from pure unsweetened grape juice, & the flecks you see in the soap are freshly crushed lavender buds.Since this soap contains both olive & coconut oils, it is soft & smooth to the skin, & is full of natural glycerin. Also contains a lovely blend of immune-boosting thyme, eucalyptus & balsa mea essential oils. Try bathing babes with this soap & see if bedtime doesn't come a little sooner!


Tangerine Tea

Although a hard bar when dry, it is soft & silky to use, & cleans & softens beautifully. One of my roughest looking bars, but really quite delightful to use. Contains peanut oil (should not be used on someone with an allergy to peanuts) & sesame oil, so is rich in Vitamin E, & very moisturizing. Although I did use a tangerine essential oil in this soap, it barely scented it. Also contains orange spice tea, which gives it its interesting colors. Men like this soap, because of the lack of scent & the moisturizing qualities.


Honeydew
Made with the same formulation as the Lavender Essentials bar, but colored instead with green tea & powdered icing dye. If you have allergies to food dyes, do not use. If dye is not a problem, however, this bar smells HEAVENLY! Like a sweet summer day, as sweet as a freshly cut honeydew melon. It also has the cleansing properties of green tea, & the moisturizing properties of natural glycerin.


Hawaiian Rains

A delightfully soft fragrance, truly the scent of a tropical paradise after a refreshing rain. Everytime someone smells this soap, they say "mmm, it smells so CLEAN." Made with freshly collected rainwater, olive & coconut oils, & colored with all natural liquid chlorophyll, this soap will pamper your skin like a vacation to Hawaii!


Ok, I will update this as I add more soaps ~ And for anyone browsing through ~ Here are the prices:

The bars run $4.50 ea

or ~ 3 for $10

or ~ six 2 oz bars for $10

Also, 1 oz bars are $1 ea, for any assortment of scents you want.

Shipping is $3, no matter how much you buy.

I take paypal, money orders & personal checks.

(The checks usually take a little while to go through, though, not the fastest way, for sure.)

Tuesday, November 25, 2008

Rub a dub dub 3 men in a tub .... wait...what?!?

Well, here it is ~ November 25 ~ you would think I could at least check in more often than MONTHLY ~ but the terrible truth is ~ homeschooling really IS time consuming. Ok, ok, I am going to dispense with the usual excuse session and just launch BOLDLY into the blog topic this post. SOAP! Yes, it's true ~ SOAP! Bet you couldn't guess that from the title. ;-D (hmmm....That harmless little child's nursery rhyme suddenly doesn't seem so very innocent.....)

All right, the way it started out was this ~ I was on BYC ~ (http://www.backyardchickens.com/) ~ and a certain post caught my eye. I spied it across a crowded room. The air was thick, the tension high.... and there IT was... the SOAP MAKERS HELP post. It's true, it was love at first sight! ( Or should that read ~ love at first site ~ ) With shaking hands, I opened the post thread, the anticipation was mounting....could it be ~ was it really true? Some of my fellow Chicken Buddies ALSO loved SOAP??? Lo & behold, it WAS true! So true, in fact, that they even went the extra lengths of MAKING it!

OOhhh,, here were my shnoz sisters, my olfactorial friends. Brave souls who, (though admittedly with great care), nonetheless skirted the wicked properties of lye & laughed in the face of fats, adventurously adding milks, juices, scented oils & miriad breakfast & spice items..... all in the name of bathing beauty pleasures!
Naturally, what was I left to do, but invest some reading time, some more reading time, some experimental time, some resources, some more time, & VOILA!! heheheheheh ~

I have concocted SOAP! It's true! I even have some pics to prove it. ( To my sweet sisters, parents, cousins, etc. who also read this blog ~ shhhh ~ don't tell anyone, this is what I am giving out for Christmas. ;-D)
Actually, in thinking this out even more thoroughly, in the very very begining, it started out as a memory ~
I remember going to my great-grandma's house, and seeing her huge uneven blocks of yellow lye soap ~ she used to tell us ~ "don't use that soap, it's just for scrubbing" ~ then she'd point us to smaller brown-ish creamy colored bars that smelled like cookies. I imagine those were the milk-based ones, based on what I've read.
She always had these wonderful homemade soaps around. Some, like the yellow, was for scrubbing, ( literally, she scrubbed toilets with it, I saw her do it, with the bar itself, and it WORKED!), & some was for bathing. These were beautiful creamy white bars, that smelled like fresh lavender. She would render & save her fats all year round. This is the same great- grandma that used to grow meat chickens & take them to my grandma's ( her daughter) house, and they would have a chicken-choppin' fest!
They both grew huge gardens as well, & not conventional ones ~ their gardens went all over the yard, mixed in with the flowers, the trees, the shrubbery, just everywhere! I remember being in those gardens thinking they were wonderlands. I especially remember the fresh raspberries & straight cream we always got as a treat when we visited. Fond memories....I have always been enchanted by the beautiful bars of handmade soaps, especially the large-ish rough looking ones, they usually smell the best! ;-D
And now, I have made a few of my own.....
Ok, Now for the pics ~
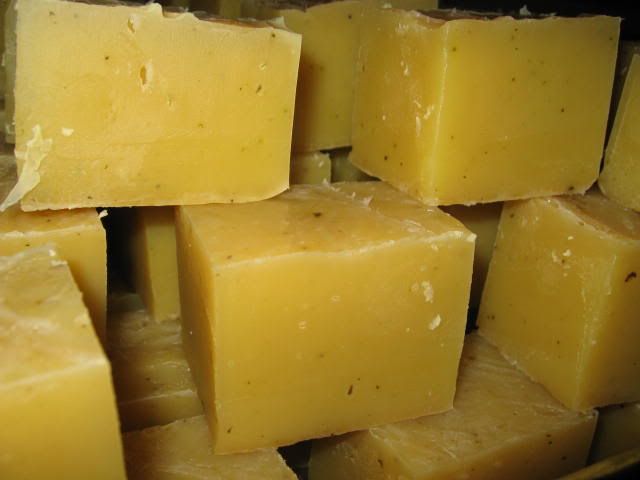
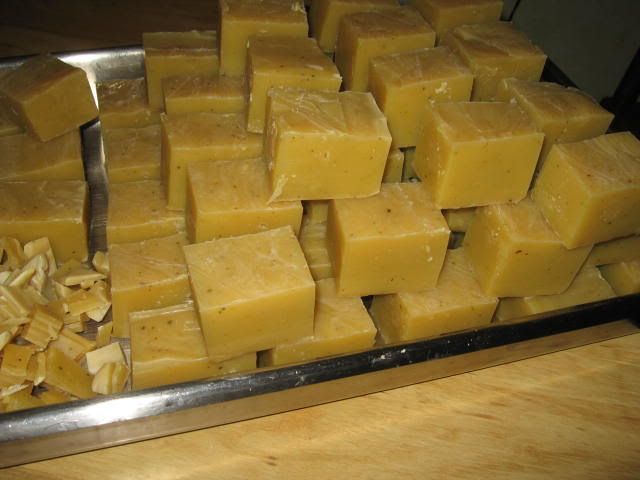
This was my first attempt at soap ~


You can see how uneven my cut was, how rough the soap is. (They are very hard, I used a lot of tallow in this recipe ~ tallow I rendered myself, I might add, from beef suet. Boy is THAT a smelly task!! The Fam won't appreciate this part of your soap-making adventures, I guarantee
it!)

Also, you can see the streaks... I believe this was caused from stirring too much after adding the fragrances. I added them too soon before trace, because I got anxious. DON'T get anxious. The bits & pieces you see are actually 2 different teas, one a lemon green tea, the other an orange & spice tea. Also, I added those teas dry, and I should have added them soaked, that way, they wouldn't have bled like they did. Although my daughter likes the bleed, she says it makes for pretty color specks in the soap, which is true, I suppose. I also added tangerine essential oil (often referred to as eo's, fragrance oils are called fo's) to this recipe ~ unfortunately, I didn't know that tangerine ( or any citrus , for that matter) tends to flash a lot faster than other scents. And, since I added it too early, ( at least a good 3 minutes prior to trace) much of the scent was affected by the lye.
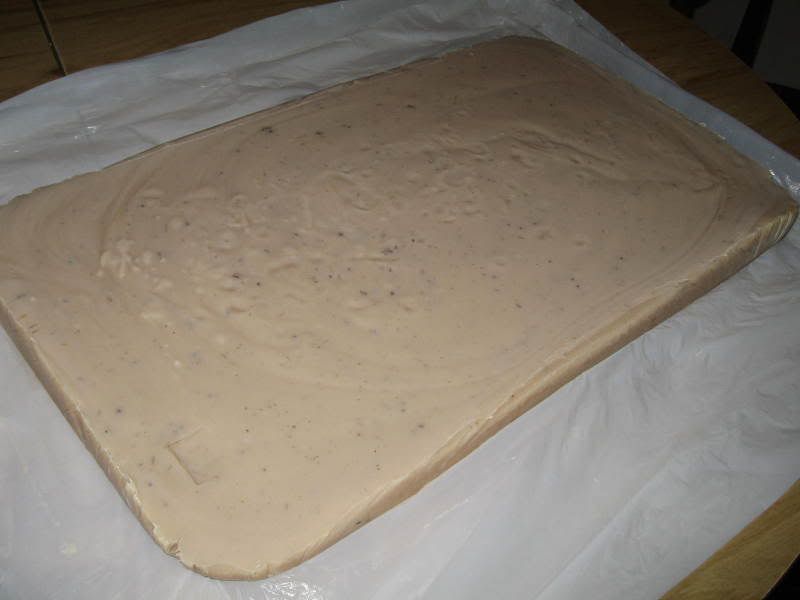
Here in the next pic, is my second batch of soap ~ This was a lavender batch. I used lavender eo, & about 1/4 cup of freshly dried lavender from my mother's garden. ( I believe she said it was called Hidcote). Since lavender sometimes has a tendency to look like mouse doodies, I decided to crush it between my fingers ~ oohh, I smelled heavenly for a while! :-D Anyway, I did better with this batch, & actually let it gel, which means that it looks like a giant tub of wet glycerin Nutrogena soap when it's at gel stage, as you can see in the pic.


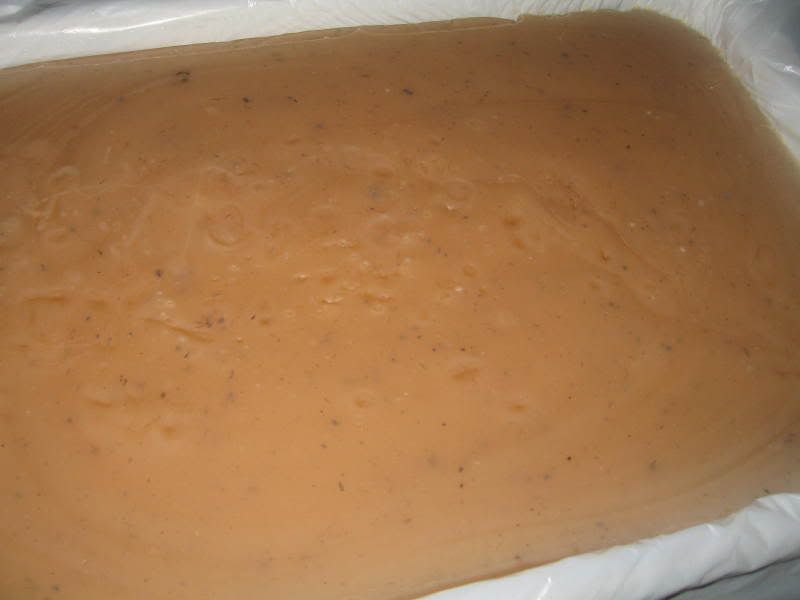
And in this pic, you can see that it is beginning to firm up. Once it has hit gel stage, you have to uncover it, so that it does not OVERheat, other wise you will have problems. So, once it has gelled clear out into the corners, I take the lid off ( I just use another similarly sized pan as a lid, no blankets or anything) & let it begin to cool. You can see the color change in the corners as it begins to cool.


One thing that I was sort of bummed about with this recipe is that I used unsweetened grape juice to color it. I was hoping for even a TRACE of lavender ~ but no such luck! Part of the problem, I later found out, was that I added it too soon to the lye/water solution.

In this pic, you can see what the slab looks like once it's been in the mold for over 5 hours. Some recipes will require at least 24 hrs to firm up enough for cutting, however, don't wait TOO long, or you will have to saw your soap apart. ( refer to first pic!)

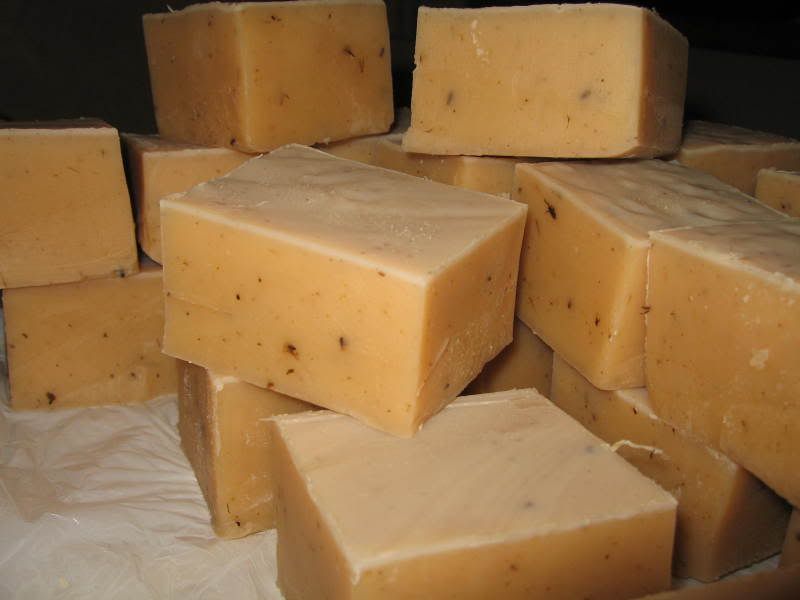
And here are the cut lavender bars. Very full of glycerin ~ they will be extremely lovely to the skin!
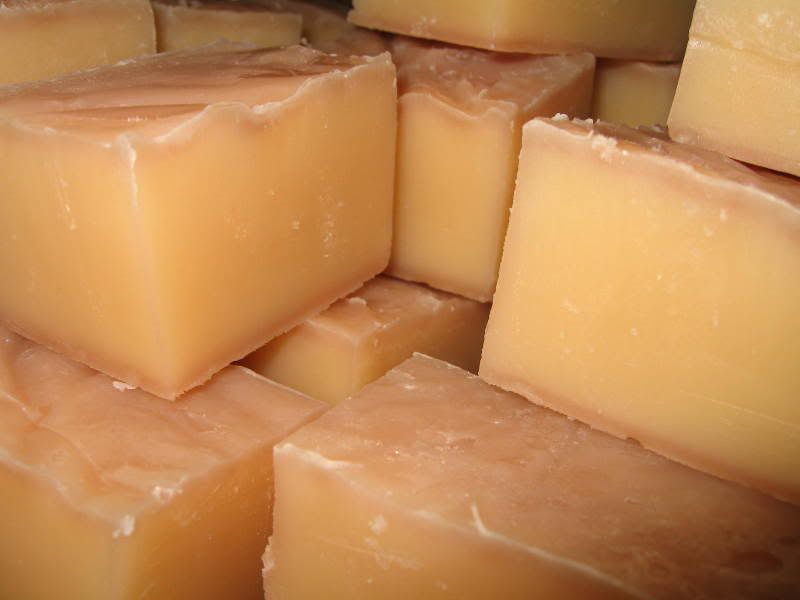
Now this batch I tried to tint green. Only not the color of green that it is! I used powdered icing dye, & a green tea concoction. ( I love to use tea, because while it may not be healthy IN the body, tea is quite beneficial ON the body) I also used a honeydew fo, so it smells like a sweet summer day.


Here is a close-up of the honeydew bars. These bars are all measuring out between 4.5 & 5.7 ounces each. A very HEALTHY amount of soap.

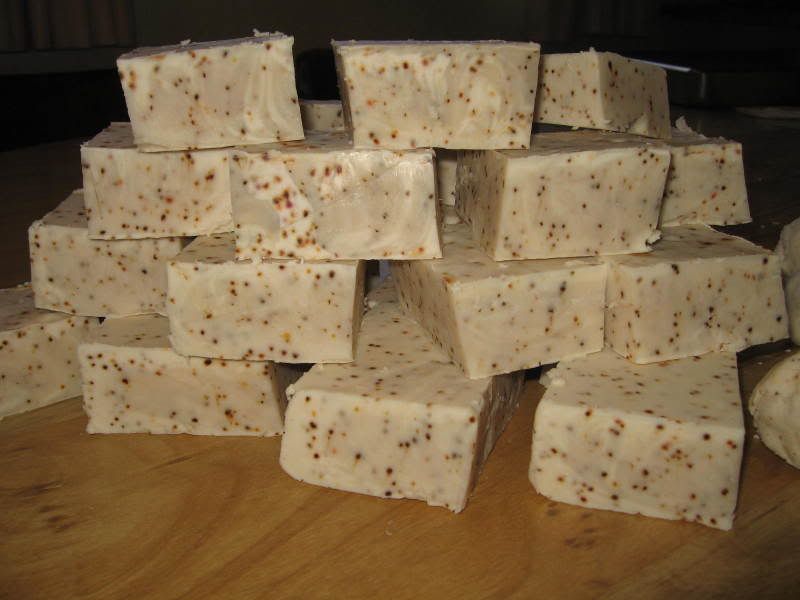
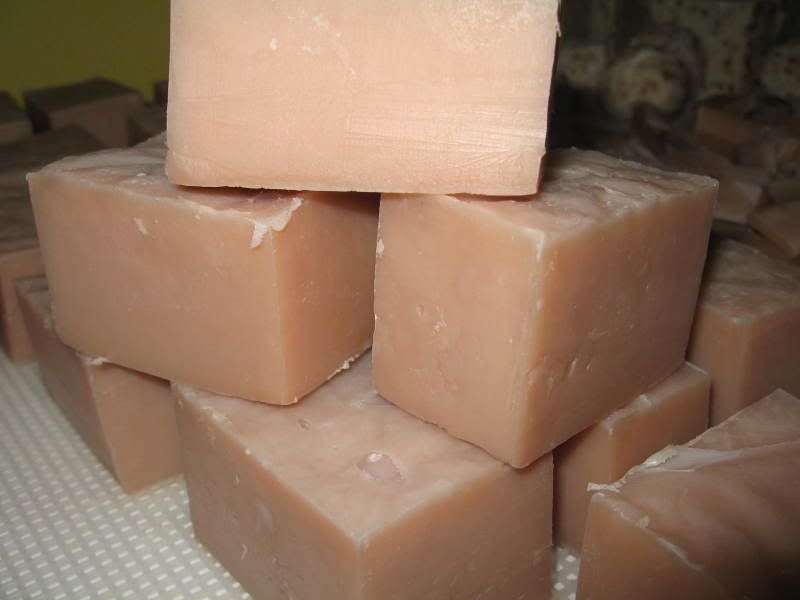
And here in this pic, we have the crabby apples recipe. I used unsweetened crabapple juice to color it, and a very lovely hibiscus fo. Just to demonstrate the ever-changing nature of soap, check out the pic below. I was slightly dissapointed at 1st cut, since the color did not seem to go all the way through, instead it seemed to create only a pretty rind all aorund the soap. Then, once I had resigned myself to this interesting outlook, and even began to think it looked pretty neat, I checked the soap again, a few days later ~

And this is what greeted me ~ ALL pink bars! So ~ now I know that juice actually CAN color your soap, but only marginally. Which is ok, because I don't care for artificial colors. Also, you can always bathe infants in soap made with juice for colors, & these soaps are mild enough for even the most sensitive of skins.


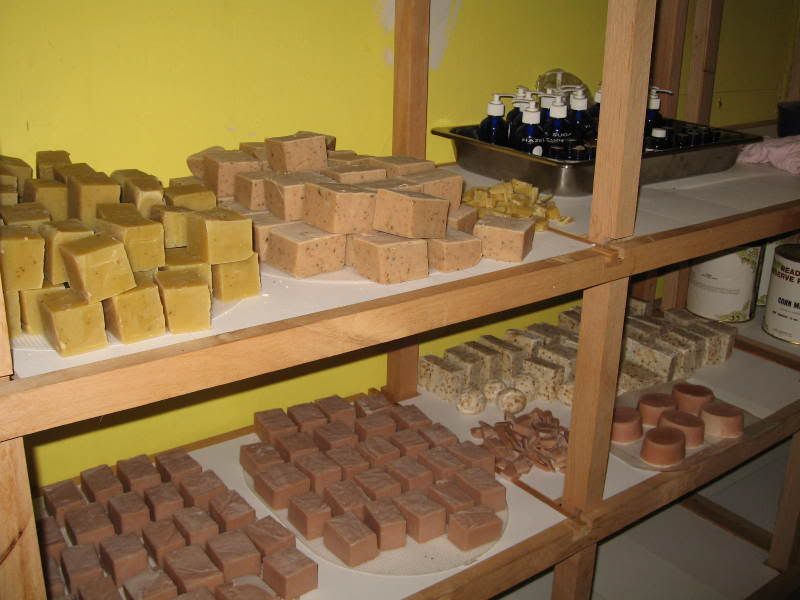
And in this final ( for now :-D) pic, you can see what happens when you tend to be a bit OCD about your crafting. Yes, it's true, I have moved around food storage a bit, and am using one whole wall as my soap drying racks! And in the next day or two ~ I am scheduled to get 2 HUGE boxes FULL of more SOAP eo's & fo's!!! WOO HOO!!! Lovely scents ~ soft, skin nourishing soaps ~ maybe even a little side fundage....... (Actually, Wood Genius intimated something to that nature ~ I believe the words were "I think if you have this much soap, you should look into the sales end of it. Cuz what you have going right NOW is enough soap to last for YEARS! And if you want to make more, I think you need to sell some off.") :-D
Anybody want to buy some soap? :-D