Showing posts with label Crochet. Show all posts

Wednesday, November 13, 2013

Newborn Kit layettes FREE BABY PATTERN LINKS

All right, in this post, I have some awesome links to some really awesome free newborn kit layette patterns. 

As you know, I and my last 2 kids at home have been going to our local humanitarian center twice a week, and I have been crocheting up items for the newborn kits.  This little activity goes hand in hand with another new passion of mine ~ GRANDCHILDREN!   YEAHHHHH!
Because YES< My oldest daughter & her wonderful husband are expecting the very first ever little GRANDSON! He is due near the end of December or the first week of January, and I have just been having a HEYDAY making little things for him.  Well, believe it or not, a kid can actually have ENOUGH  newborn handmade items....... and so, in my excitement, I make quite a few for charity too.  This not only uses up yarn stash, but also helps out other little wee ones as well.

So, in my quest for some really great, cute, versatile & FREE patterns, I have come across quite a few links to some very LOVELY patterns.  I hope that this can help any of you out there in your similar quests!


As you can see, this is a great, versatile pattern that can easily be male or female, just change up the colors!  Here is the link to Joanne Holt's fantastic newborn bubble, and on Ravelry, here.
 
 
Ok, now for the sweater pattern ~ Here we have a very fun sweater pattern that also can be male or female, depending on trims, colors, and etc. 
 
For this little sweater, I didn't add the sleeves, and I added decorative integral ties as well as a scalloped edge.

Same sweater pattern, but I have added a few rows for the sleeves.

Here again, same sweater pattern, but the sleeves are in contrast.

And with this one, I sort of improvise a fancy lower half.
This wonderful sweater pattern comes from Beth Koskie, over at Bundles of Love. 
If you would like to see my personal changes to this sweater, you can look it up on Ravelry, here.


Believe it or not, these both come from that same sweater pattern as well! Just a few trim differences, sleeves, and colors all make for a VERY versatile pattern that is FAST, EASY, and cute!!


This is my own dress & bloomers pattern,  posted here, & on Ravelry, for the dress, here,
and for the bloomers, here.  Each only takes a few hours to make, & any new mother will love them!
 
Now for the hat & booties.  The booties come from Beverly Qualheim, & can be found on her website, as well as on Ravelry. 
A few changes that I made to this pattern include an extra row of hdc ( 5 rows, instead of 4), a few different ways of decorating the cuffs, & a ruffle on the 3rd row from the bottom (pink & yellow booties).


I seem to have stuck the hat pics in the middle of the bootie pics.  Ah well ~
This hat pattern is my own, but it is totally inspired from Cathy Wood, at Cat's Rockin Crochet Fibre Arts.  I will post a proper pattern for this, along with a few sweater patterns on a new post soon.
If you understand how this form of crochet works, however, this may suffice for now ~
just chain 36, all stitches are done in the back  loop only,  go back along the chain with dc's until you get to the last six chains~ sc in each of those, make about 17 to 20 rows,  fold it in half length-wise, whip stitch or sl st  up the side, gather the sc end, stitch shut, & add a pompom.  Now fold up the brim twice, and VOILA, cute baby hat!


And this little pair of Valentine booties comes from this pattern, by Sandy Hagan, except that I changed up the cuff again.

 
This little set was actually NOT made for charity, but rather my sweet coming grandson, however, there is a free pattern for this, as well. It can be found over at Cathy Woods, with her Cats Rockin Crochet, as well as on Ravelry,  and let me tell you, she really does ROCK!  You will LOVE the ingenuity of these all-in-one designs.  Once you get the hang of it, you can adjust the sizes to whatever you need, just get the measurements right, and VOILA, adorable baby clothes!! 


And here are a few of the sets put together. 


For a boy.

Asian-inspired, it seems so springy to me!

For a sweet girl.

And another for a girl.  By the way, this photo bothers me, because the way I put the pieces together make it look like it just has bad proportions ~that's really not how it is in reality.  It actually goes together better.  Just bothers me, & since I already sent it in, I can't retake the pic.  It was late at night, what can I say.
 
I hope that you have enjoyed these free pattern links, and I would just be thrilled if you sent me pics  of your finished projects as well.  I will post them here so others can see your amazing work & charitable hearts.  Remember if we all work together,  with God's help, we can overcome any obstacles!

Tuesday, November 12, 2013

Free Easy Baby Sundress & Bloomers Pattern

What is new here at Blurt Blogger?  Well, as most of you know, I homeschool, and this year, we decided that we needed to incorporate service hours into our curriculum.  What does this have to do with a couple of free patterns?
Everything! ( I felt remotely like Yoda right there......) ;-D
We decided we wanted to help the community out with our service hours, so we looked into our local humanitarian center.  This is an organization that our church (LDS, The Church of Jesus Christ of Latter-day Saints, or more commonly known as "the Mormons") uses to help locally in our community, as well as nationally & internationally, when there is excess, or specific special needs. 

This is a link to them ( so far only on facebook, that I know of) https://www.facebook.com/idahofalls.area.humanitarian.center

And this is what they are about;  "Helping the poor and needy prolong life, reduce suffering, be self-reliant, prepare for emergencies, sustain life, and promote personal responsibility."

These are some of the things we produce there:
Toys for children, twin/full/queen quilts, receiving blankets, bereavement clothing, hygiene kits, church nursery kits, new born kits, and many more items. 

This has been a wonderful addition to our lives!  My 15 yr old son likes to help out with the wooden toys ~ he sands, basecoats them & always helps put away things & lift heavy stuff on clean-up day.  My 17 yr old daughter loves to do some of the coloring, cutting, Velcro-ing & organizing of the folder games & lessons.  ( these are actually sent out to places like Haiti, where it is difficult for the people there to obtain early learning materials.)

And I?  Well, I love to do the crochet.  And THAT is where the free patterns come in.  :-D  ( See, it really DID have to do with everything!) ;-D

I made up these two patterns in response to a need for very quick & very easy additions to the newborn kits. As such, I ask that you not sell these patterns, or put them on other webpages, please just link back to this.  I don't care if you want to sell anything made from these patterns, but I would appreciate it if you included a set or two once  in a while for your local OB ward.  They always need them,  they always appreciate them,  and you will be blessed for lending your talents to serve others.

And now for the patterns: 

Easy Baby Sundress

 
This pattern is available as a free Ravelry download
This is a very simple little sundress that can be manipulated in so many ways! If you use sport weight yarn & a 3mm hook, you will gain a preemie size, DK & a 4mm hook will give you a newborn size, DK & a 5mm hook will get you 0-3 months size, & worsted weight & a 5.5mm or 6mm hook will give you 3-6 months size.
Stitches used: ch = chain
sc = single crochet
dc = double crochet
V-stitch = double crochet, chain 1, double crochet, all in the same spot.
sl st = slip stitch
Yoke:
Row 1:
Chain 68, in 3rd chain from hook, dc 1, & dc 1 in each chain for the next 8 chains (10 stitches total). V-stitch (double crochet, chain 1, double crochet) in the next chain. ( this is the back half, the extra 3 stitches count as button tab.) dc in the next 15 chains. V-stitch in the next chain. (this is one shoulder side).
dc in the next 15 chains. V-stitch in the next chain. (this is the front of the dress). dc in the next 15 chains. V- stitch in the next chain. (this is the other shoulder side.) dc in the next 7 chains, chain 3 & turn.
You will notice that there are 3 extra stitches on one side, this is because those stitches will be used as the button tab.
Row 2:
dc into 2nd dc from end (ch 3 acts as first dc on row), dc 1 in the next 6 dc’s. V-stitch into the chain1 center of V-stitch. dc into the next 17 dc’s. V-stitch into the ch1 center of V-stitch. dc into the next 17 dc’s. V-stitch into the ch1 center of V-stitch. dc into the next 17 dc’s. V-stitch into the ch1 center of V-stitch. dc into the next 11 dc’s, ch 3 , turn.
Row 3:
dc into 2nd dc from end (ch 3 acts as first dc on row), dc into the next 12 dc’s. V-stitch into the ch1 center of V-stitch. dc into the next 19 dc’s. V-stitch into the ch1 center of V-stitch. dc into the next 19 dc’s. V-stitch into the ch1 center of V-stitch. dc into the next 19 dc’s. dc into the next 9 dc’s. Ch 3 & turn.
Row 4:
dc into 1st dc, (skip 1, 2 dc, ch1, 2 dc) into next dc 4 times. 2 dc into ch 1 center of V-stitch, ch 1, 2 dc into NEXT V-stitch center. (skipping 19 dc’s & Thus forming the arm-hole). (skip 1, 2 dc, ch 1, 2 dc) 10 times, then 2 dc into ch 1 center of V-stitch, ch 1, 2 dc into NEXT V-stitch center. (skipping 19 dc’s & Thus forming the 2nd arm-hole), (skip 1, 2 dc, ch1, 2 dc) into next dc 4 times, skip 1, 2 dc into the next stitch ( there will be three stitches left, this is ok, it forms the button tab), sc 1 & slip stitch join to the other 2 dc’s. ch 3, but DO NOT turn.
All of the remaining rows will be worked in the round.
Row 5:
dc 1, ch 1, 2 dc into join ( ch 3 acts as 1st dc in row), (2dc, ch 1, 2 dc) into the ch1 of each ( ) set, all the way around, treating the join under the arms as a ( ) set. You should have 21 ( ) sets altogether.
sl st join last ( ) set into first ( ) set. sl st through very top of 1st 2 dc’s (1 is a dc, 1 is a ch3) in the round, so that you are now in the center of the ( ) set. This sets you up for the next round of ( ) stitch sets, allowing for a seamless look.
Rows 6- 16:
chain 3, dc 1, ch 1, 2 dc into join ( ch 3 acts as 1st dc in row), (2dc, ch 1, 2 dc) into the ch1 of each ( ) set, all the way around, sl st join, & sl st to center of ( ) set. Repeat 10 times.
Row 17:
Break off yarn if you are doing a contrast color. with contrasting color, sl st between ( ) set joins, and make a shell of 7 dc’s into center of ( ) set. sl st inbetween next ( ) set, & continue around, to make a total of 21 shells.
Finishing:
sc around neck-line in contrasting color. You may also wish to sc around the armholes.
Add a button or two sewed onto the flap in the back, no need for button-holes as the dc stitches work just fine for it.
Also, if you wish, the buttons may be the front of the dress just as easily as the back.
I hope you enjoy this simple little pattern. I made it up in response to a need for our local humanitarian center newborn kits, because it is fast & easy, & can be worked up in just a few hours.
I also have made up a bloomers or diaper cover pattern to match this dress. I hope you will try it out!
Also, if you have some spare yarn, please make a little set for some needy child at your local OB ward, just drop it off, I guarantee they can always use it, it will help someone who truly needs it ~ a tiny innocent new one. Have a beautiful, service-filled day, & God Bless you for your kindness!


Newborn Bloomers or Diaper Cover
 
This pattern is available as a free Ravelry download
This pattern can be adjusted easily for size, just add more rows of the ( ) sets. If you must add more at the waistline, remember that the repeat is 3. Also, If you use sport weight yarn & a 3mm hook, you will gain a preemie size, DK & a 4mm hook will give you a newborn size, DK & a 5mm hook will get you 0-3 months size, & worsted weight, a 5.5mm or 6mm hook, & add a few more rows, it will give you 3-6 months size.
Stitches used: sl st = slip stitch
Sc = single crochet
Dc = double crochet
Ch = chain
Row 1:
Chain 65, slip stitch join to beginning of chain, being careful not to twist, ch 3, do NOT turn
Row 2:
Dc into each chain 65 times, for a total of 66 stitches. Sl st join & ch 2.
Row 3:
Sc into each dc 65 times, sl st join, sl st to 1st sc
Row 4:
In 1st sc, ch 3, dc 1, ch 1, dc 2, skip 2 sc’s, & ( 2 dc, ch 1, 2 dc,) skip 2, repeat ( ) set to the end of row, sl st join to beginning ch 3 of 1st set.
Row 5 – 13:
Sl st in tops of ch 3 & dc stitches to chain 1 center of ( ) set, ch 3, dc 1,ch 1, dc 2 to make beginning set of next row. Skip to next ( ) center & ( 2dc, ch1, 2 dc) all the way around, for a total of 21 ( ) sets. On last row, Sl st to join last ( ) set with beginning ( ) & then center your bloomers, find the middle, do a sl st join, secure & break off yarn.
Legs:
Row 1:

Sl st into one of the center ( ) sets, sc, then sc into each ( ) center & in between each ( ) set, for a total 20 sc’s, sl st join, ch2
Rows 2 & 3:
Sc in each sc, sl st join, ch 2 (repeat). Break off yarn & weave in ends.
Make a tie & thread through every 3 dc’s on waist band, & TAA DAAAA, you are done!
I hope you enjoy this simple little pattern. I made it up in response to a need for our local humanitarian center newborn kits, because it is fast & easy, & can be worked up in just a few hours.
I also have made up sundress pattern to match these bloomers. I hope you will try it out!
Also, if you have some spare yarn, please make a little set for some needy child at your local OB ward, just drop it off, I guarantee they can always use it, it will help someone who truly needs it ~ a tiny innocent new one. Have a beautiful, service-filled day, & God Bless you for your kindness!
 
Here are a few variations of these patterns.


Monday, June 18, 2012

Shabby Chic Wedding Reception on the Cheap ~ 3


 All right, here is the final chapter on my daughter's wedding reception ~ with the exception of actual pics of guests at the event. We had so many wonderful friends who helped out, brought their own items & ideas into play, and just really made this actually happen. We are sooo grateful to them all!


These cake plates were a breeze, & very inexpensive ~ I just found vintage plates & vintage candlesticks & glued them together with glass glue.  Another good way to glue them together, especially if you have bumpy designs on the bottom of the plate, is to use a clear silicone glass sealant.  The sealant comes out white, but dries clear, & you can wipe off the excess with your finger. 


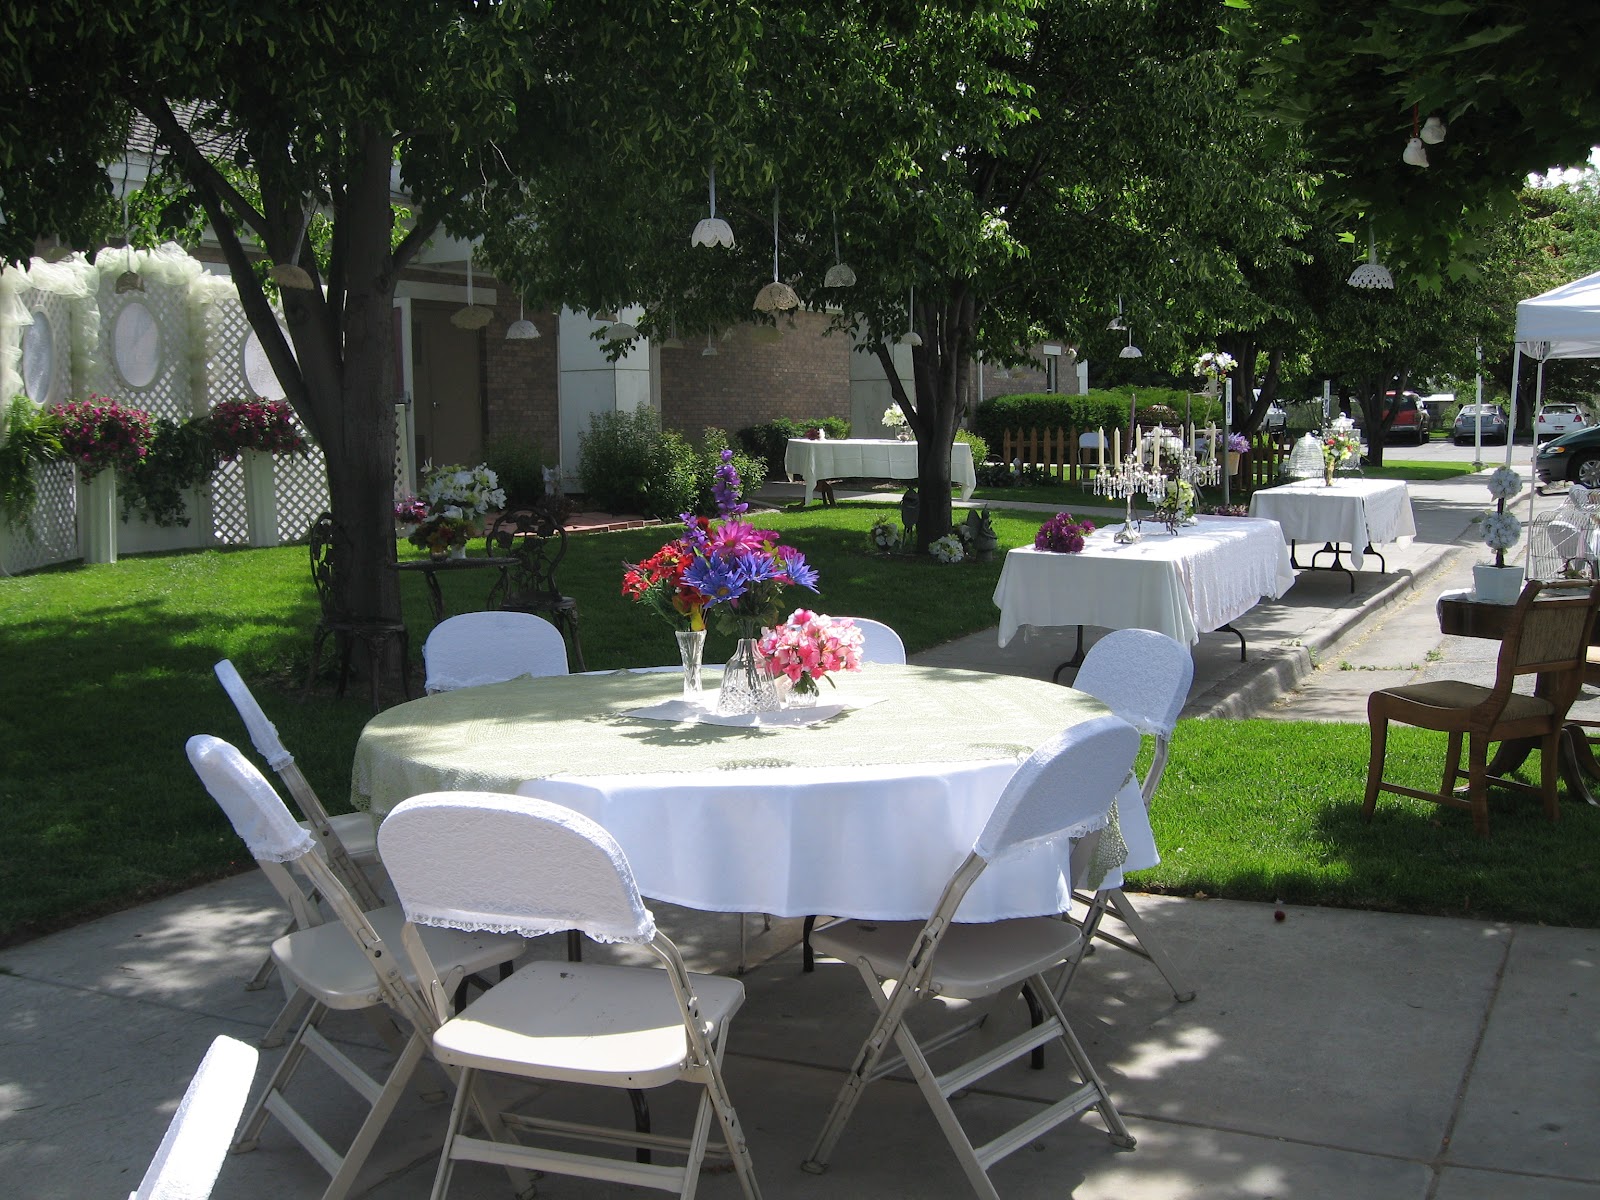
Did you wonder how all of those crocheted doily lanterns would turn out?  Well, I think it's a little like a fairy land!

We held this at our church, out on the lawn, so there were signs that we sort of wanted to ~disguise ~ .  You can still see the sign on the street side, but the other side housed our cupcakes, as well as some pretty flowers in a few old buckets.  We just used a double-ended hook to hang one of them.  Oops ~ see the fern that fell down in the background from the lattice backdrop?  I didn't ~ too busy hurrying to take a few pics before the guests all arrived.  I did straighten up as I went, but....you'll notice a few laces out of place, windblown tablecloths, etc, don't mind those ~ ;-D ~ I had to put the camera down & straighten & by the time I got done, guests were going to arrive, photographer came for photo's, & it was time to "play ball".

The beautiful backdrop ~ this was the effort of several people ~ One awesome friend & her totally awesome mother provided the backdrop & picket fence pieces & quite a bit of greenery, another had the beautiful flowers & more greenery, & yet another helped to put it all together.  I am so blessed by good friends!
Several of the table set-ups.   The vintage wooden chairs came from a set that we bought for the bride & groom as a wedding gift.  The duncan phyfe table is one of a matched pair that we had hanging around the house & thought would look right.  The bird cage is just an old cage I had picked up years ago when I thought I might try bumblebee quail.  The beautiful topiaries came from a wonderful friend of a friend.  Same friend also decorated the arch.

 All of these flowers came from the dollar store!  yes, it's true, with the exception of the greenery by the picket fences, the hanging petunia's, & the greenery stuck into backdrop, all of the flowers were Dollar Store! The crystal & statuary came from 2nd hand stores, and the crocheted tablecloths all came from eBay.  A few of the cloths were quite stained &/or made with different colored thread, so I just evened the color out by dying them.  Of course, being cotton, they took beautifully!  And those are just linen napkins under the vases.  Most of the silver came from either garage sales or eBay.
 Here you see some simple chair covers ~ from the same awesome friend that had the backdrop ~ not fussy, but just enough to pretty it up.  The cast iron table & chairs came from my mother's garden, as did the playing frogs, the large angel & the other garden statuary.  In the background, you can see the large glass water dispensers; we haven't added the ice or the lemon & lime slices to them yet, nor have the nuts, chocolates or creamcheese mints been set out on the tables.  Also, see those beautiful silver candelabra's in the background?  Those came from craigslist... for $10 each!
 These beautiful vintage milk-glass containers came from garage sales & 2nd hand stores.  The cute little resin birds as well as the clip-on paper birds came from the dollar store.
Pretty brass swans ~ from garage sales.  Really, see, I clearly just collect a lot of interesting crap, & when the time comes to put on a "whing-ding", I just have so much stuff tucked away, that it's easy to assemble it all into something actually usable.  See, I now have total justification for having all of this crap. ;-D

This awesome old steamer trunk was from a dear sweet friend, she also loaned me the orange chair, the birdcage on a stand, & the 2 wooden benches.  The cool old leather trunks were from... you guessed it, a 2nd hand store!


Isn't this arch just amazing?!  The arch itself came from my mother (who bought it online from Walmart, in the garden section) & the tulle was... yup... from a  garage sale!  That kissing ball hanging in the background is just a round foam ball with dollar store flowers stuck all about, a ribbon secured by one of the flower stems, & hung from a garden planter hook that my mother happened to have.
Here are some vintage salt birds that my grandma gave to me & my husband back when we were married (wow, that was 21 yrs ago!) & the crystal vases were....uuhuhhh.... 2nd hand store!

Ah ~ you can see how the wind picked up there for a bit whilst we were setting up.  Had us a bit stressed, but it died down, so I only had to re-arrange once or twice.

My foster-daughter's little angel, dancing around like a princess!!
The same wonderful gal who decorated the arch & brought the white topiaries also brought this beautiful birdcage. 

Again, believe it or not, the paper clip-on birds & the resin birds came from the dollar store, and the mushroom birds all came from Micheal's.

This kissing ball was my mom's idea, and I loved it!  Perhaps you can see the cake table in the background, before we put any cake on it.  That is the table that goes with the cool sway-back chairs.
My foster-daughter, her daughter, & my nephew, surveying the scenes before guests arrive.  Do you see the patio she's standing on?  My husband & son brought those over from our garden & arranged them so that we wouldn't be trampling the ground coming in & out of the primary room.  I think they did a stellar job!

Patio close-up ~ again, milk glass from 2nd hand stores & garden statuary from my mother's garden.


Such cute frogs ~ again, from my mother's garden.  And all of the little floral arrangements you see here & there are, again, dollar store flowers arranged in green foam & put into pretty silver sugar bowls & creamers & pitchers & the like.

One of my dear friends had these little white felt love birds ~ I was so thrilled, because I had really wanted to make a bunch of little white felt birds (you know this if you have seen my felt adventure posts ;-D), but I just plain didn't have the time.  She had no idea I had wanted to do that, but came up & offered some birds she had which she thought might go with the theme.  I was ecstatic, because, of course, they were perfect!  Just what I had hoped for, but I didn't have to make them!


The doily cupcakes.  These were really easy to do.  Sam's Club sells a box of 150 cupcakes for $26, & a HUUUUGE bucket of whipped icing for $20.  If you use a Wilton shooter, you can shoot 3 boxes of cupcakes with ONE bucket of icing.  Crazy cheap, doesn't take too long, you can make them up the night before, (they come frozen, & thaw as they sit overnight.), & they look pretty darn cute!


The doilies are really easy to do ~ you just get a package of 8" or 11" rounds ( see which fit you like better), fold them in half snip off the ends generously, cut out the centers, and use double sided sticky tape or glue that won't be affected by moisture as they thaw.  I found elmer's to work nicely, but the double-sided tape was faster.  We just used some of the cardboard from the cake boxes cut to fit the wrought iron corner stand.

Oh boy, at this point, we have the cake on the table, the guests are going to start arriving in about 10 minutes, & my daughter ( the bride!?!) is working through the last of the formal photo's.  Here you can see the different types of cakes we bought.  They were from Sam's Club, cost $36 each, & were scored to feed 96 from each cake.  Three different cakes ~ white cake & pineapple filling, white cake & strawberry filling, and chocolate cake with bavarian creme filling.  The fun thing about putting them on cake plates (each plate had it's own silver server) is that guests could come by & serve themselves from the plates.  And, in my mind, anyway, it made the cakes look more homemade, but beautifully were NOT ~ saved me HOURS of work... worth every single cent & then some ~ ;-D (and, they were good cakes!).

The wedding round ~ this cake also came from Sam's Club, and only cost a whopping $14!!!!  Yeah!  It came with the pretty gum-paste flowers, too.  The bird cake topper was a pretty awesome find as well ~ we went to a small local cake shop, & the owner heard us talking about incorporating birds into our theme.  She said " I just pulled this bird out of storage the other day, would you like this?"  Of course, we were all freaking out happy, because it was PERFECT!  And, come to find out, it was vintage as well!  Straight from 1978!  And she only charged us $4.99 for it.  Too perfect!

Uh-oh, one last hurried shot before the guests start to arrive.  I've been shooting pics, straightening things out, adding little touches here & there, & it's almost time to go!